How to Change a Tire

All drivers should be able to change a flat tire.
Car Safety Image Gallery All drivers should be able to change a flat tire. See more car safety pictures.
© iStockphoto.com/Richard Addison

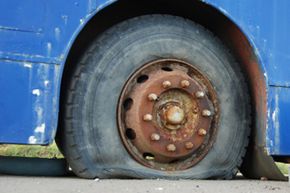
Flat tires, like taxes and death, are simply an inevitable certainty in life. So, rather than thinking about what you'll do if you get a flat tire, start thinking about what you'll do when you get a flat tire. Face it: Sooner or later, you're likely to feel the dreaded pull of an unstable car or hear the flap-flap-flap of dead rubber.

There are a few things you can do in basic vehicle maintenance before hitting the road that may minimize your chances of getting a flat tire; however, it's best if you know how to change a flat, just in case. Changing a flat tire can seem daunting at first, but car manufacturers have made the process as easy and straight-forward as possible.

Advertisement

More importantly, knowing how to change a tire can also save you money and time. From a car maintenance standpoint, a repair or road service club is only as good and as fast as the next tow truck that happens to pass by, and if you have a meeting or an appointment to get to (flats seem to happen at the worst of times), then having the skills necessary to change a tire can literally make or break your day.

It's also a good feeling to know you're capable in a roadside emergency and that you have the knowledge and skills to get your car back on the road again, including the ability to perform basic automotive maintenance. However you decide to look at it, understand that learning how to change a tire ranks on the auto maintenance difficulty scale somewhere near checking the oil level and monitoring your tire pressure -- regardless, it's a good skill to learn, even if you never use it.

Keep reading to find out how to change a tire, and some of the reasons behind doing it correctly.

Tools Needed to Change a Tire

Changing a tire is a relatively simple affair and most cars come with the equipment to perform the procedure as part of a basic vehicle-maintenance package. The car's owner's manual should also have instructions on where your tire changing equipment is located and the proper procedures.

A basic a tire changing kit typically includes:

Advertisement

  • A jack
  • A lug wrench with a socket on one end and a pry bar on the other
  • A spare tire

Additional tools, depending on the make, model and year of your vehicle may include:

  • A wheel lock
  • Extension bars for lowering the spare tire
  • Alignment studs

Jacks come in several varieties -- scissor jacks, floor jacks, bottle jacks and even bumper jacks. A scissor jack is the most common type and uses a mechanical scissor mechanism to lift the car. A bottle jack is more powerful but less compact and uses hydraulic fluid to lift the car.

The tire rim is held to the wheel hub by lug nuts screwed on to wheel studs. Before the spare tire can be fitted to the car the old rim and flat tire needs to be removed. Before this is accomplished, the lug nuts must be loosened and this is done with the lug wrench. A lug wrench is essentially a large socket wrench with one socket that matches the size of the lug nuts on your wheels. The length of the handle adds mechanical advantage -- the longer the handle, the more force you can exert on the nut. The pry bar on the other end is used to remove the hub cap and sometimes to pry the rim off the wheel hub if it's stuck on with rust or dirt.

Finally, there's the spare tire. Spares are either full-size or temporary (often called "donut" or "space saver") spares. A full-size spare offers more advantages as far as safety is concerned, but it's difficult to store, especially in smaller cars. It also weighs more and is harder to manage onto the wheel hub at ground level. A donut spare is easier to store and easier to manage on to the hub. However, it's generally less safe, usually limiting driving speed to less than 50 miles per hour (80.5 kilometers per hour) and a range of less than 60 miles (96.6 kilometers). Good car maintenance means checking the air pressure in the spare tire on a regular basis, too. It only takes a couple of minutes but may save you hours of aggravation someday.

The additional items listed are needed by certain cars rather than all cars. Wheel locks are a specially keyed lug nut socket designed to keep thieves from stealing your wheels. While a good idea, the locks are often lost, misplaced or simply disregarded until necessary -- but by then it's too late. If your car has wheel locks, tape the socket to the jack or to the inside of your glove box so it won't be lost.

Some car models store the spare under the car. The spare is lowered to the ground by turning a post that lowers the spare on a wire. This post is turned with an extension bar that's also used to help drag the spare out from under the car. This part of the car is often neglected during routine automotive maintenance. Every so often, and before long trips, make sure the spare will lower and the action on the mechanism is not rusted or corroded.

Many European cars use wheel bolts rather than wheel studs. Wheel studs stay on the hub and serve as a mounting surface for the spare. Wheel bolts screw into the hub and come off with the tire. With this type of system, putting the tire back on the car means having to manage the tire with a bolt through a rim hole and being able to wrestle the whole thing into position to screw the bolt in. This system is difficult to deal with even in controlled conditions, let alone on the side of a busy road. Wheel studs are a lot easier to deal with as the studs remain attached to the wheel hub and allow you to hang the tire on them and then replace the lug nuts.

Preparing Your Car for a Tire Change

When a tire goes flat on the road, a driver has very little time to find a safe place to pull over and prepare for a change. The ideal surface would be flat, level and solid -- like a parking lot.

Part of good vehicle maintenance sometimes isn't just about the tools, but also the know-how. Drivers should train themselves to quickly spot good flat fixing areas by being aware of their surroundings. Finding a good spot is really about knowing what to avoid -- specifically soft ground and hills.

Advertisement

The next consideration is parking as far away from traffic as possible. You definitely don't need the added danger of attempting to fix a flat tire while you're close to moving traffic. You risk being hit by an inattentive or reckless driver.

The next step, once you've found a good spot, is to turn on the car's emergency flashers or hazard lights. Checking these lights to ensure they work properly should be a routine part of your regular car maintenance.

With the flashers on, make sure the car can't roll once it's lifted. Apply the parking brake and shift the transmission into the "Park" position or in reverse gear if the car has a standard transmission. Now get out of the car and chock (block) the wheels. The wheel blocks can range from large roadside stones to specially designed wheel wedges. Anything that stops the car from rolling away will work. Place the blocks in front of the front tires if you're changing a rear tire and behind the rear tires if you're changing a front tire.

Hopefully your regular automotive maintenance schedule has given you the opportunity to check the condition of the spare and tools. If not, now's the time to find out just how lucky (or unlucky) you are. Remove the jack and lug wrench from the car, as well as the spare tire.

Again, regular auto maintenance would ensure these items are in good working order and condition. If not, well, it's time to call a tow truck. But if your spare tire and tools are ready to go, keep reading to find out what to do next.

Removing Your Old Tire

Lifting a corner of a car that weighs a few thousand pounds poses some challenges, but it's definitely possible.The first order of business in vehicle maintenance should always be safety. All passengers should get out and stand at least 10 feet (3 meters) away from the car and any passing traffic -- even if it's bitter cold outside, a torrential downpour or blazingly hot. Never, ever crawl underneath a car that's supported with only a jack. While a jack should do its job, it's not very stable and one bump can send the car crashing to the ground. If a car begins to move while it's on a jack, clear the area and wait for it to fall. Don't even attempt to stop it. Cars can be repaired, people are far more fragile.

Your owner's manual should show the proper placement for the jack. On unibody cars this is usually the metal seam that runs along the lower edge of the car on each side between the front and rear tires. This area is sometimes covered by a plastic fascia. However, there are generally openings along the fascia where the seam is uncovered. Placing the jack here will avoid damaging the plastic bodywork when the car is lifted. Cars with frame members typically have specific lift points, too. These are often indicated by a triangle cut into the frame metal, usually just in front of the rear tire and slightly behind the front tire.

Advertisement

Raise the jack until it's supporting, but not lifting the car. The jack should be firmly in place against the lift point of the vehicle and on firm, level ground. Make sure that it's positioned properly.

Remove the hub cap and loosen the lug nuts by turning them counterclockwise; however, don't take them all the way off yet. Just break the resistance. You can use the lug wrench that came with your car or a standard cross wrench will work, too. Your wrench may have different size openings on different ends. Be sure to place the right size wrench opening on the lug nut. The right size is the one that slips easily over the nut but doesn't slip or rattle.

Leaving the wheel and rim on the ground at this point means the force you're exerting against the wheel lug nut goes directly to the nut. If the wheel were raised off the ground then all you would succeed in doing is turning the wheel.

Remember, it can take a lot of force to break the lug nuts free. If you can't seem to free them you can use your body weight to push against the wrench handle, or you might even want to stomp on the wrench to help the effort. Just be sure you're turning in the right direction. Some drivers also carry a long pipe that fits over the wrench handle, adding even more mechanical advantage to the driver's efforts.

Once all the lug nuts are loose, pump or crank the jack to lift the flat tire off the ground. You need to lift it high enough to remove the flat tire and to put the spare tire on as well. Lift the car slowly while checking to ensure the car is stable.

If you notice any instability, lower the jack and fix the problem before fully lifting the car. If you notice the jack lifting at an angle or leaning, lower the jack and move it so that it can lift straight up.

With the tire completely off the ground, remove the lug nuts the rest of the way and then gently remove the flat tire.

Attaching Your New Tire

Once the old wheel is off, place it flat on the ground and slide it under the edge of the car, leaving room for you to continue to work, of course. Now if the car falls off the jack the additional height of the wheel will lessen any damage. However, if the jack was placed on a flat, solid base and other precautions were taken, there should be no problems.

Now mount the spare tire on the wheel hub. The deep side of the spare should face the inside of the car. Take care to align the rim of the spare tire with the wheel bolts. Then hand tighten the lug nuts. Some lug nuts are open at both ends. If this is the case, the cone-shaped end goes in towards the rim -- the shape helps center and lock the nuts in position. With poor vehicle maintenance, sometimes the bolts may be too rusty to hand-tighten so start them by hand just to make sure they're not cross-threading, and then turn them on with the lug wrench until they're snug but not tight.

Advertisement

To ensure the nuts are snug and applying even pressure across the wheel, tighten them in a pattern where one nut is tightened, then move to the opposite nut. For a five-stud hub this equates to a star pattern. For four- and six-stud hubs this means tightened in opposite pairs, then moving the wrench one stud to the left or right and tightening that opposite pair until all the nuts are tight.

Because the car is up in the air at this point don't use too much force. The idea is to simply tighten the nuts enough so when the car is lowered the wheel won't pop off under the weight.

Remove the old tire from under the car and lower the vehicle until the wheel touches the ground, but isn't yet bearing the full weight. Now fully tighten the nuts in the same pattern you used before. Then lower the car all the way to the ground and remove the jack. Tighten the nuts one more time, as tight as you can make them without straining the wheel studs.

Stow your jack and tools in the correct place (remember this is part of good car maintenance) and put the old tire in the trunk or on the back seat. Your first order of business now is to have the flat tire repaired or replaced and mounted by a professional.

For more information about tires, vehicle maintenance and other related topics, follow the links on the next page.