How to Make a Coke Can Stirling Engine

How can you turn one of these into a small engine? Want to learn more? Check out these car engine pictures!
Sean Ellis/Photographer's Choice/Getty Images

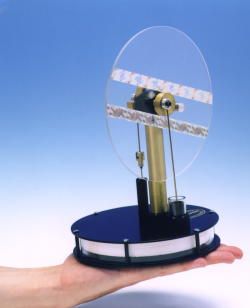
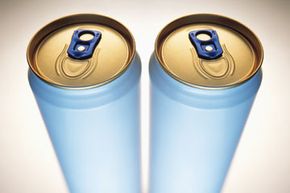
If you have a few soda cans and a few other easy-to-find accessories, you can recreate one of the first commercially viable engines ever made. Though small in size, a Coke can Stirling engine still speaks to our collective mechanical soul as it chuffs and chunks away on a shelf, rotating a flywheel, spinning a few fan blades, or even generating a few watts.

Its very simplicity evokes a different time. And whether looked at as a proof of concept, an interesting model, a conversation piece or a piece of kinetic sculpture, making a soda can Stirling engine is a great way to step into the past.

Advertisement

The Stirling engine was the brain child of Robert Stirling, who invented the concept in 1816. The idea behind his engine was to use air to power an engine, rather than the up-and-coming technology at the time -- steam.

What set Stirling's engine apart from other was the use of an "economizer," which enhanced fuel economy. This is now known as a regenerator. Between 1816 and 1843 Stirling and his brother, James, refined the engine's design and efficiency. By mid-19th century his engines were powering major industries including foundries. However, his engine, as well as most hot air engines, was more suited to low-power applications. His desire to create a safer alternative to the oft-exploding steam engines was defeated by the need for more power to run growing industries.

The first thing you should know about a Stirling engine is how the parts go together, and how they work.

Advertisement

Supplies for Building a Coke Can Stirling Engine

Take away Stirling's regenerator and you have a hot air engine. How a hot air engine works is simple. Air becomes what is termed the "working fluid." A heat source, in the case of most soda can Stirling engines, this is a tea light candle, heats the air causing it to expand. The air is then cooled, causing it to contract. The expansion and contraction of the air, or working fluid, is a thermodynamic cycle. Now, use this thermodynamic cycle to move a piston and you have effectively allowed the thermodynamic cycle to produce useful mechanical work. When you attach a crankshaft to the piston, and add on a flywheel, you have the basics of an engine.

Get through building one Stirling engine and you'll learn more than a few lessons on home-brew engineering. Most of all, building one is a lot of fun, and gives you a chance to get creative with what most people consider junk. And seeing it work takes it to a whole new level.

Advertisement

Sound simple? It is, but there is still a while to go before the engine is built. You'll need more components, a few materials and an understanding of how they all fit together before your engine is chuffing away.

Here's what you'll need:

  • Three (3) soda cans
  • One (1) balloon
  • Two (2) spoke nipples
  • Four (4) 5A electrical terminal blocks
  • Steel wire wool
  • A bottle cap from a plastic bottle
  • Steel wire
  • Copper wire
  • Dowel rod
  • Electrical wire
  • Fishing wire
  • Three (3) compact discs
  • Can opener
  • Utility knife
  • Super glue [source: ScrapToPower.com]

Let's take a tour of the components you'll be constructing, see how they work, what they do, and how it all fits together.

Advertisement

Preparations for Building a Coke Can Stirling Engine

A simple tea light candle can provide the heat for a soda can Stirling engine.
Lisa Romerein/The Image Bank/Getty Images

"You have to think like a watchmaker," says Jim Larsen, a long-time Stirling engine builder, author and educator. "You have to pay attention to the details. If you pay attention to the details, you have a better chance of success."

The major components of a Stirling engine are relatively simple and straightforward. While we're focusing on a soda can engine, engines have been built using materials ranging from paint cans to oil drums. Larsen said during a Thanksgiving challenge while visiting in-laws, he built a Stirling engine from assorted hardware store materials, including pots and pans.

Advertisement

Aluminum soda cans offer ready-made, preformed shapes perfect for the engines. They're also easy to work with and, of course, very cheap. And while not robust enough for serious usage, they'll withstand the micro-horsepower produced by most engine plans.

The pressure chamber is a vessel that holds the captive air, or working fluid, within the closed system. It is here the air is heated and cooled during the thermodynamic cycle. While air and pressure leaks can be the bane of many engines the pressure chamber actually needs a small controlled leak. Without this leak, the chamber would simply become a barometer and only react to changes in the barometric pressure of the air around it.

Larsen said many Stirling builders opt to change the working fluid in the pressure chamber from air to helium, which reacts better during the thermodynamic cycle.

The drive mechanism uses the expansion and contraction of the air inside the pressure chamber to drive a crankshaft. The drive mechanism can either be attached to the side of the engine, or be integrated into the structure of the engine.

For Larsen, the crankshaft is the most critical part of the engine, and influences every part of the whole, from timing, to displacer travel, to the speed of the flywheel, and the balance of the whole. "This is a part you want to spend time on to get it right," said Larsen.

Advertisement

Assembling a Coke Can Stirling Engine

The flywheel serves as more than indication the engine is working. It acts as something of an energy storage device. A well-balanced flywheel takes the energy created during the power stroke of the motor and stores it. When energy is needed to push the displacer down the flywheel provides its stored energy to overcome friction and other forces. Without a good flywheel the displacer would simply rise to the top of the chamber and stay there.

Larsen said having a well-balanced flywheel is key to efficiency. If the wheel is not balanced the engine has to work harder to move it. "You don't want the engine to do more work than it has to," he said.

Advertisement

The displacer in a hot air engine serves to displace the air within the pressure chamber. Remember, the engine cannot run without the thermodynamic cycle where is air is heated and cooled, causing expansion and contraction. If the pressure chamber was simply heated, without anything within it to displace the air, the air inside would heat up and expand, but never contract.

With the heat source at the bottom, the hot air engine also uses cooling at the top, usually ice or cold water, to cool the air. As the air is heated it expands moving the displacer to the near the top of the pressure chamber. At the top of the chamber the air is cooled, contracts, and moves the displacer down. This all happens with the aid of the drive mechanism, crankshaft and flywheel.

The displacer is most commonly a rolled piece of steel wool with a light wire running through the center. Remember when Larsen spoke about needing to think like a watch maker? This is one of those times. The displacer needs to be able to slide freely within the pressure chamber, while at the same time filling most of it. It needs to allow for the free flow of air, while restricting some of the flow. The idea is to minimize friction and maximize effectiveness. This theme is a constant throughout the construction of the engine.

The heat box is simply a stand the engine sits on. The heat source is placed below the engine.

This seems like a lot of work for not a lot of return. But there is a tangible feeling when you finish the engine, troubleshoot the works to get it going, and see it puffing along on its own. For Larsen, his fascination began more than half a decade ago, while yours could begin in as little as a few days from now.

Advertisement

Lots More Information

Sources

  • Brown, Buster. "How Hot Air Engines Work." Hot Air Engines. (Feb. 29, 2012) http://www.hotairengines.com/WorkingDescription/Work.htm
  • Editors of Make Magazine; "The Best of Make." O'Reilly Media, Inc. 2007. Pgs. 306-317.
  • Larsen, Jim. StirlingBuilder.com. (Feb. 29, 2012) http://www.stirlingbuilder.com/
  • Larsen, Jim. Personal interview. March 2, 2012
  • Larsen, Jim. "Eleven Stirling Engine Products You Can Build." Self-published, January 2012. (Feb. 29, 2012)
  • Larsen, Jim. "Quick And Easy Stirling Engine." Self-published. September 2011. (Feb. 29, 2012)
  • Nice, Karim. "How Stirling Engines Work." HowStuffWorks.com. May 4, 2001. (Feb. 29, 2012) https://www.howstuffworks.com/stirling-engine.htm
  • Purvis, Ben. "Dean Kamen developing eco hybrid that will run on anything that burns." Gizmag.com, June 28, 2009. (March 1, 2012) http://www.gizmag.com/dean-kamen-segway-hybrid-scooter/12096/

Advertisement

Loading...