How to Identify and Repair a Radiator Leak in 2023

By: HowStuffWorks  | 
radiator leak
Cooling System Vital: Radiator prevents overheating by circulating coolant through the engine. boonchai wedmakawand / Getty Images

Imagine driving to an important meeting, and suddenly, you notice the temperature gauge in your car skyrocketing. Panic sets in as you realize that your car is overheating. Radiator leaks can be a nightmare, but knowing how to identify and repair them can save you time, money, and stress. In this blog post, we’ll take you through the process of recognizing the signs of a radiator leak, locating the source, understanding common causes, and exploring effective repair solutions, as well as preventive maintenance to avoid future leaks.

Short Summary

  • Recognize early signs of radiator leaks such as temperature gauge fluctuations, coolant level drops and puddles under the vehicle.
  • Locate source of leak through visual inspection or using a coolant system pressure tester.
  • Prevent radiator leaks with regular maintenance including checking and flushing coolant levels, inspecting/replacing caps & cleaning cooling system regularly.

Advertisement

Recognizing the Signs of a Radiator Leak

Detecting a radiator leak early can save your engine from serious damage, as coolant loss impairs the cooling system’s ability to keep the engine cool. The sooner you catch a radiator leak, the better chance you have of preventing more significant problems.

So, what signs should you be looking for? Let’s dive into the most common indicators: temperature gauge fluctuations, coolant level drops, and puddles under your vehicle.

Advertisement

Temperature Gauge Fluctuations

Your vehicle’s temperature gauge is a crucial component that can alert you to potential radiator leaks. Sudden changes in the gauge reading may signal an issue with your cooling system. Several factors can cause temperature gauge fluctuations, such as:

  • a defective thermostat
  • low coolant level
  • a clogged radiator
  • a bad water pump

Ignoring a high temperature gauge can lead to engine damage and costly repairs, so always address any fluctuations as soon as possible by visiting auto parts stores for a replacement.

To prevent further problems, it is essential to investigate the cause of the fluctuations. Here are some steps you can take.

  1. Check the coolant level.
  2. Inspect the hoses and connections for damage or wear.
  3. If you can’t identify the issue, it may be time to seek professional help to diagnose and fix the problem before it escalates.

Coolant Level Drops

Monitoring your coolant reservoir is essential in detecting a decrease in coolant levels, which could be a sign of a leaking radiator. The coolant reservoir is located under the hood and should be checked regularly to ensure that the coolant is within the recommended range. A decrease in coolant levels indicates that the system is losing coolant, potentially due to a radiator leak.

If you notice your coolant level dropping, inspect the radiator, hoses, and connections for any signs of leakage. Early detection and repair can save your engine from overheating and causing severe damage. Remember to always use safety gear, such as goggles and gloves, when working with the cooling system, and let the engine cool down before starting any work on the radiator.

Puddles Under Your Vehicle

One of the most obvious signs of a radiator leak is discovering a puddle of fluid under your vehicle. If you notice an orange or green-colored liquid beneath your car, it’s likely a coolant leak. Pay attention to the location and color of the puddles to help pinpoint the source of the leak.

Keep in mind that other fluids could also be leaking from your vehicle, such as motor oil or brake fluid. It’s essential to correctly identify the leaking fluid to address the issue properly. If you suspect a coolant leak, check the radiator, hoses, and connections for damage and consult a professional if necessary.

Advertisement

Locating the Source of a Radiator Leak

Once you’ve recognized the signs of a radiator leak, the next step is to locate the exact source. Pinpointing the leak’s origin is crucial for a proper repair, as different causes may require different solutions.

In this section, we’ll explore two techniques to help you find the source of your radiator leak: visual inspection and using a coolant system pressure tester.

Advertisement

Visual Inspection

A thorough visual inspection of your radiator and cooling system components is the first step in locating the source of a leak. Here are some things to look for:

  • Signs of damage or corrosion on the radiator itself
  • Signs of damage or corrosion on the radiator cap
  • Signs of wear, damage, or deterioration on the hoses and connections

Take extra care when dealing with hot radiator fluid that may be spraying from the leak, and always wear safety gear during the inspection process.

If you can’t locate the leak through a visual inspection, don’t worry. There is another method that can help you pinpoint the source with greater accuracy: using a coolant system pressure tester.

Using a Coolant System Pressure Tester

A coolant system pressure tester is a valuable tool that can accurately identify the source of a radiator leak. The tester creates a seal on the radiator or pressure cap spout and pumps pressure into the system to assess if the radiator can sustain it. The pressure can be used to determine the source of the air leak. If it drops, that’s a clue that an air leak is present.

When testing for a radiator leak, follow these steps:

  1. Use a maximum pressure of 10-15 pounds to avoid damaging the radiator or cooling system components.
  2. Invest in a coolant system pressure tester, as it can save you time and money in the long run by accurately identifying the source of the leak.
  3. Fix the issue before it becomes more severe.

Advertisement

Common Causes of Radiator Leaks

Understanding the common causes of radiator leaks can help you diagnose and repair the issue more effectively. In this section, we’ll delve into the most frequent reasons behind radiator leaks, including pinhole leaks, damaged radiator caps, and faulty seals and connections.

By knowing these common causes, you’ll be better equipped to address the problem and prevent future leaks.

Advertisement

Pinhole Leaks

Pinhole leaks are small leaks that result from corrosion within the radiator. These tiny leaks are usually caused by rust or damage to the interior of the radiator. Pinhole leaks can decrease the efficiency of your radiator, leading to overheating and potential engine damage.

To address pinhole leaks, it’s essential to regularly inspect your radiator for signs of corrosion and rust. If you discover any pinhole leaks, you should consider using a commercial leak sealant or radiator epoxy as a temporary fix. However, if the damage is too severe, the radiator may need to be professionally repaired or replaced.

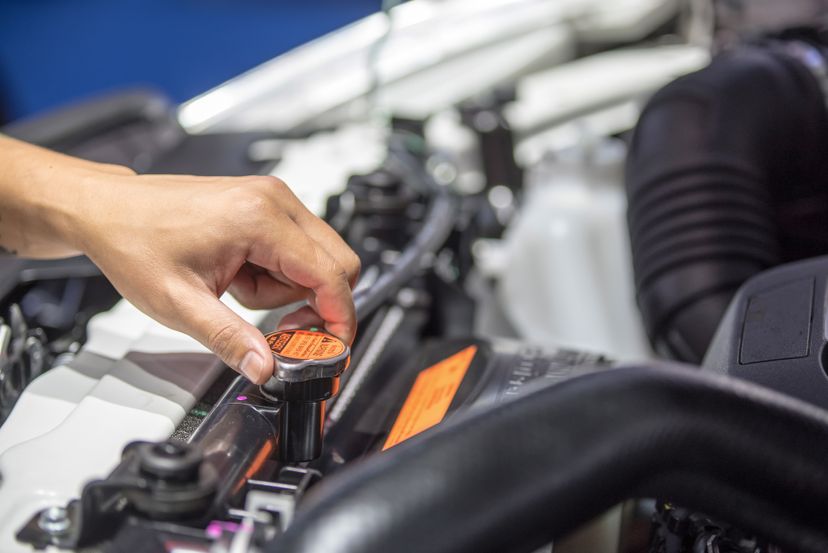
Damaged Radiator Caps

A damaged or ill-fitting radiator cap can lead to leaking coolant and reduced cooling efficiency. Inspect your radiator cap for signs of wear and tear, such as cracks, dents, or corrosion. If your radiator cap is damaged, it’s important to replace it with a new one to prevent further issues.

To ensure the effectiveness of the radiator cap replacement, run the engine and inspect for any signs of coolant leakage from the radiator. Remember that an improperly sealed radiator cap can cause coolant loss, engine overheating, and severe engine damage, so it’s essential to address any issues with the cap promptly.

Faulty Seals and Connections

Seals and connections play a crucial role in maintaining a leak-free cooling system. Faulty seals and connections can result in a radiator leaking, which may be caused by age, wear, or incorrect installation. The loosening and subsequent leakage of union nuts connecting the water line and valve to the radiator is another common occurrence.

Recognizing and repairing faulty seals and connections is vital to ensure your cooling system’s proper functioning and efficiency. Regularly inspect your radiator, hoses, and connections for signs of wear or damage, and replace any faulty components as needed.

Advertisement

Effective Radiator Leak Repair Solutions

Once you’ve identified the cause of your radiator leak, it’s time to choose the most effective repair solution. In this section, we’ll discuss various methods for repairing a radiator leak, from commercial leak sealants to radiator epoxy and professional repairs. Each solution has its advantages and limitations, so it’s essential to choose the one that best suits your specific situation.

Commercial leak sealants are a popular choice for radiator repairs. They are easy to apply and can be easily applied.

Advertisement

Commercial Leak Sealants

Commercial leak sealants are products that provide a reliable seal for radiator leaks. These sealants are not as effective as professional repair solutions, but they can offer a temporary solution for minor leaks. The advantages of using commercial leak sealants include providing a reliable seal for radiator leaks and being a cost-effective temporary solution.

However, commercial leak sealants have some drawbacks. They are less effective than professional repair solutions and are only a temporary fix. If you choose to use a commercial leak sealant, it’s essential to monitor the affected area closely and seek professional help if the leak persists or worsens.

Radiator Epoxy

Radiator epoxy is a specialized adhesive that can effectively seal minor leaks in the radiator, providing a more permanent solution compared to commercially available leak sealants. To use radiator epoxy, follow these steps:

  1. Clean the area around the leak with a wire brush.
  2. Mix the two-part epoxy according to the package instructions.
  3. Apply the epoxy to the leak area.
  4. Allow the epoxy to dry.

After following these steps, the leak should be effectively sealed.

While radiator epoxy can be an effective solution for some leaks, it’s not suitable for all types of radiator leaks and is less effective compared to professional repairs or replacement. Always wear protective gloves and safety glasses when applying radiator epoxy and follow the package instructions carefully.

Professional Repairs and Replacement

When the task of repairing a radiator leak is beyond your capabilities, it’s time to seek professional help. A certified mechanic can accurately identify the source of the leak and replace any defective components. Professional repairs and replacement services are the most reliable option for repairing a radiator leak, ensuring your cooling system stays in top condition.

To prevent future leaks, a professional can also inspect your radiator for signs of wear and tear, examine the radiator cap, and replace any faulty seals or connections. By seeking professional help when needed, you can avoid severe engine damage and costly repairs in the long run.

Advertisement

Preventing Radiator Leaks Through Proper Maintenance

Preventing radiator leaks is just as important as repairing them. In this section, we’ll discuss the importance of regular maintenance in keeping your cooling system in top condition and avoiding radiator leaks. By following these preventive measures, you can save yourself from the headache of dealing with a leaking radiator and potential engine damage.

Regular maintenance is key to avoiding radiator leaks. Check your coolant levels regularly and make sure to flush.

Advertisement

Regular Coolant Checks and Flushes

Checking your coolant levels and performing coolant flushes are essential parts of your car’s preventive maintenance routine. Regular coolant checks ensure that your cooling system has the right amount of coolant and is not running low, while coolant flushes help remove contaminants or buildup that could cause radiator leaks.

To check your coolant level, make sure the engine is cool before opening the coolant reservoir. The coolant should be between the minimum and maximum lines.

To perform a coolant flush, follow these steps:

  1. Drain the old coolant from the reservoir.
  2. Fill the reservoir with fresh coolant.
  3. Start the engine and let it run for a few minutes to circulate the new coolant.
  4. Turn off the engine and check the coolant level again.

Inspecting and Replacing Radiator Caps

Inspecting your radiator cap for damage and replacing it when necessary is crucial in preventing coolant leaks and maintaining proper cooling system efficiency. Check your radiator cap for signs of wear and tear, such as cracks, corrosion, or other signs of damage. If the cap is damaged, replace it with a new one to avoid further issues.

To ensure the effectiveness of your radiator cap replacement, follow these steps:

  1. Run the engine and inspect for any signs of coolant leakage.
  2. Make sure the radiator cap is properly sealed to prevent coolant loss and engine overheating.
  3. This will save you from costly repairs and potential engine damage.

Keeping Your Cooling System Clean

A clean cooling system is essential in preventing radiator leaks and maintaining optimal cooling system performance. Regular cleaning can help prevent corrosion and buildup that could lead to leaks. To clean your cooling system, use a dilute cleaner like Simple Green Pro HD mixed with water, or perform a coolant flush as described in section 5.1. It’s important to note that brake cleaner should not be used for this purpose.

In addition to cleaning the system, consider having your radiator professionally descaled to remove any buildup. By keeping your cooling system clean, you can extend the life of your radiator and prevent future leaks.

Advertisement

Summary

In this blog post, we’ve explored the importance of recognizing the signs of a radiator leak, locating the source, understanding common causes, and choosing the most effective repair solution. We’ve also discussed the crucial role of regular maintenance in preventing radiator leaks and keeping your cooling system in top condition. By staying vigilant and taking preventive measures, you can save yourself time, money, and the headache of dealing with a leaking radiator.

This article was created using AI technology.

Advertisement

Advertisement

Loading...