How to Change Brake Pads

Is it time for new brake pads?
Changing the brake pads on your vehicle isn't as complicated as you may think.
Todd Arena/iStockphoto

When choosing a new vehicle, lots of people make their decisions with airbags, crumple zones, and several other safety features in mind. But many take for granted one of the most important safety systems a vehicle can offer -- the brakes.

Few parts on your car will be as important to you (and your passengers) as the brakes, which are responsible for slowing the car down and bringing it to a stop. Having a healthy, well-maintained set of brakes could possibly mean that you'll never even need those airbags and crumple zones.

Advertisement

Let's quickly review how brakes work. Most modern cars have disc brakes on all four wheels, though some cars still have drum brakes in the back and disc brakes up front. On a disc-brake-equipped vehicle, a set of heat-resistant pads grip the spinning brake rotor when you push the brake pedal, using friction to slow the wheel down and ultimately bring the car to a stop. (For a more detailed description, see How Disc Brakes Work.)

­Over time, those pads get worn out, reducing their ability to slow the car down. That's why it's important to change brake pads whenever it becomes necessary; however, you don't always have to go to a mechanic for the purpose of fixing brakes. While brake repair is often something best left to the pros, this particular type of brake work is something you can do in your own garage.

In this article, we'll discuss how to change brake pads -- a rather simple do-it-yourself project that can save you a trip to the repair shop. Read the next page to learn how to determine when it's time to switch to new brake pads.

When to Change Brake Pads

Machining gives the rotor a new, smooth surface
If you neglect brake pad maintenance for too long, you'll have to have the brake rotors machined or maybe even replaced.
Peter Ginter/Getty Images

Above all else, remember this: It's dangerous to wait too long to change your brake pads. As the brakes are applied repeatedly over thousands of miles, the brake pads gradually wear down, reducing their ability to stop the car. But how do you know when it's time to change your brake pads?

­Luckily, it's not difficult to determine when your vehicle is ready for some brake work. Disc brakes usually include a part called a wear indicator. A wear indicator is a small piece of metal attached to the brake pad that contacts the brake rotor when the pad material has been worn down to a certain level. When the wear indicator grinds against the rotor, it makes a squealing noise as you apply the brakes. This noise is a signal which tells you it's time to have your brakes examined.

Advertisement

In other words, noisy brakes aren't something to mess around with. If you hear that sound when you apply the brakes in your vehicle, have them checked out as soon as possible.

If you're fixing brakes yourself, there are other signs to look for as well. If the brake pad is severely worn down, it can leave deep, circular-shaped marks and grooves in the brake rotor. Those marks, called scores, look a lot like the grooves on a record and are a sign that the brake pads need to be replaced. If the scoring on the rotor is particularly deep -- from lack of timely maintenance -- the rotor itself may need to be swapped out with a new one. If the grooves don't run too deep into the surface of the rotor, you may be able to have them turned (or machined) to give the rotor a new, smooth surface. Typically, turning a set of rotors costs less than replacing a set of rotors.

While you're looking at the pads, it's also a good idea to inspect the brake lines for cracks and holes. If there is a fault (or leak) in any of the brake lines, you could experience a loss in pressure and your brakes won't work properly -- they may even completely fail. Don't forget to take a good look at the fittings, too. The brakes are supposed to be sealed at this end of the system, so you shouldn't see a drop of brake fluid anywhere near the wheel. If you do find a leak, try to locate the source. Depending on your abilities, you can either fix the leak yourself or have it repaired by a professional. Either way, repair it as soon as possible. Even a small leak in a hydraulic brake system can be very dangerous.

Your brake pads should last tens of thousands of miles, but that depends on the specific vehicle you drive and your own driving habits. The more you use your brakes, the shorter the lifespan of your brake pads. When it comes time to fix them, don't be afraid to do the brake repair yourself.

Up next, we'll tell you how to get your vehicle ready for the new pads.

Preparing to Change Brake Pads

If you don't have a lift like this one, then you'll need to use jack stands.
When you're changing the brake pads, it's not enough to just raise the vehicle on a jack. You'll need to use jack stands -- that is, if you can't raise it up the way mechanics do.
Scott Olson/Getty Images

Fixing brakes, especially when you're talking about replacing brake pads, doesn't have to be a demanding job, but the right amount of preparation can make it go by even faster and ensure your safety, too. Here's how to get your vehicle ready for the job.

Start by placing blocks under the wheels so there's less of a chance of the car rolling anywhere when you're working on it. Next, loosen (but don't remove­) the lug nuts on the wheel where you want to change the brake pads -- just as if you were changing a tire.

Advertisement

Next, use your vehicle's jack to lift the car up and then secure it with jack stands. This step is very important. Changing a tire is a relatively fast procedure, but replacing the brake pads takes just a little while longer. Plus, you're going to have more of your body underneath the vehicle when you're doing brake work than you typically would when you're changing a tire. Securing the vehicle is critical at this point in the procedure. Your tire jack won't be enough to safely support the car while you're changing brake pads, so jack stands are necessary. An additional floor jack may be useful at this point, too; otherwise, you'll need to use the vehicle's jack to lift one wheel at a time.

Once the jack stands are in place, lower the car with your vehicle's jack until it's securely resting on the stands. You should refer to your owner's manual for the proper placement of the jack stands. Be sure to give the car a little shake when the jack stands are in place. After all, if it's going to happen at all, it's far better for the car to fall now than when you're under it.

Now that the car is in the air (and properly secured), finish unscrewing the lug nuts and take the tire and wheel off. This will leave your brake rotor, brake caliper and brake pads exposed.

So, now your vehicle is ready, but what will you need to actually change the pads? In the next section, we'll talk about the tools you'll need to get this brake repair job done.

Tools for Changing Brake Pads

Audi's R8 brake rotor, caliper and pads
You may not drive anything as fancy as this Audi R8. But even if you did, brake pad repair is a job you can always do yourself.
MICHAEL LATZ/AFP/Getty Images

The tools for fixing brakes, especially the ones used for changing your brake pads, are not hard to use. In fact, they can typically be found at any hardware store or auto parts shop. 

­Here's a rundown of what you'll need, and why:

Advertisement

  • A C-clamp -- This will press on the caliper assembly and push the piston all the way in, resetting the brake once the new pads are in place. Note: Some vehicles will require the use of a special ­brake caliper tool to retract the brake caliper piston. Remember, prior to beginning any repair job, it's always a good idea to thoroughly investigate what will be required in order to determine any special tools you may need -- like a brake caliper tool
  • A wrench to remove the caliper bolts -- You may need an Allen or Torx wrench for this job, depending on the vehicle. 
  • A lug wrench -- To remove the wheel nuts; although, you've most likely already used this tool prior to raising the vehicle. 
  • Gloves -- These are to protect your hands from the chemicals and dirt that you'll encounter during the procedure. 
  • A dust mask and safety glasses -- The mask is to prevent breathing in brake dust, and the glasses are to protect your eyes from flying metal pieces and/or fluids during the actual brake work. 
  • New brake pads -- Obviously, these are to replace your old, worn out brake pads.

Many of us probably already have most of these tools lying around in our garage or work area. In other words, brake repair isn't completely out of reach for the average do-it-yourself weekend mechanic. In addition to the simple tools list above, the new pads won't exactly break the bank, either. A set of standard replacement brake pads for your vehicle can be found at just about any auto parts store or even online. Typical prices range between $40 and $100 per axle.

Next - we'll discuss how to remove your old brake pads so you can start repairing your brakes.

Removing Old Brake Pads

Removing the old pads
Remove any hardware holding the old brake pads in place (if any) and they should slide right out.
Jim Jurica/iStockphoto

Now that your car is raised up and you have your tools ready to start fixing brakes, it's time to do what you set out to do: Remove the old brake pads and replace them with new ones.

Let's quickly review where we are in the process, so far. The car is up in the air and the tire and wheel have been removed to expose the brake rotor and caliper. To remove the brake pads, we first have to remove the caliper. Use your wrench to loosen the bolts holding the caliper in place, then remove the bolts completely (or as far as they will allow).

Advertisement

Once those bolts are removed, lift the caliper off the brake rotor. It will still be connected to the vehicle via the brake line. This is really important -- don't let the caliper hang by the brake line. This can cause damage to the line and ultimately lead to brake failure. Instead, secure the caliper to a nearby suspension component using a bungee cord or a piece of hanger wire. Make sure that the brake line is slack and not pinched, kinked or in the way of any of the tools that you'll be using for the rest of the procedure.

Take a look at the brake rotor without the caliper in the way. If the brake rotor is deeply scored or has grooves in it, you probably will want to have that part resurfaced or possibly even replaced entirely. Remember, it's important to take all parts into account when doing your own brake repair.

If you turn the caliper over, you can now see the brake pads themselves. They're typically held in place by pins or bolts or sometimes both. Remove whatever type of hardware that's holding them to the caliper and slide the pads out.

Now inspect the pads. Do they look worn out? Are they relatively thin compared to the new pads that you've purchased? If so, you've made a good decision and it's time to put new pads on [source: Memmer].

Good work, so far! Now that you've got the old pads out, let's put the new ones in and finish up this brake work.


Installing New Brake Pads

Inserting new brake pads
Once the brake caliper piston has been retracted, you can slip the new pads into the slots where you found the old ones.
Lisa F. Young/iStockphoto

It's nearly time to install the new brake pads. But there's one more step to complete before you can do that. You have to manually retract the caliper piston.

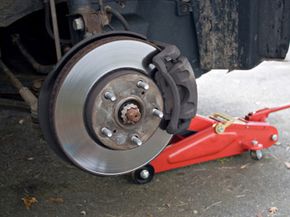
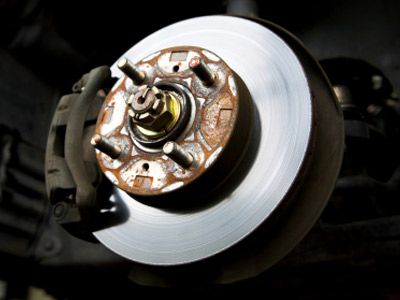
­If you look at the inside of the caliper you'll see a cylindrical piston coming out -- this part pushes on the inboard side of the brake pad. You'll see that it has adjusted itself to match your worn-out pads, so you'll need to reset the piston to its original position before the caliper, along with your new (and thicker) brake pads, will fit over the rotor.

Advertisement

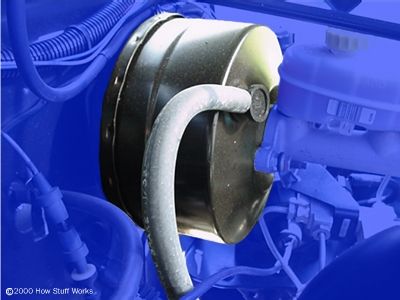
Before you reset the caliper piston, it's a good idea to remove the cap that covers the brake fluid reservoir. If you don't, you'll be fighting against a significant amount of brake fluid pressure.

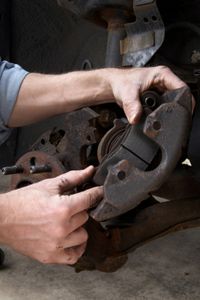
Now that the reservoir cap is removed, this is the part where you'll need that C-clamp. Place the end with the screw on it against the piston. You can use a small piece of wood to protect the surface of the piston, if you choose. As you turn the screw, the clamp will increase the pressure on the piston. Keep tightening it until you're able to slip the new pads into the caliper and fit the caliper and the new pads over the brake rotor.

If you find that the piston isn't properly retracting, don't force it. You may have a caliper that's been designed with a piston that slowly turns as it extends. If that's the case, then you'll need a special tool to thread the piston back into the caliper. A brake caliper tool -- a tool specifically designed to retract this type of brake caliper piston -- is available for purchase at most auto parts stores. If you can't find one there, then you can order the tool online -- or if you're really lucky, maybe your neighbor will have one that you can borrow for the afternoon.

Once the brake caliper piston has been fully retracted, you can re-cap the brake fluid reservoir. It's not a good idea to leave the cap off of your brake fluid reservoir for any longer than is absolutely necessary. Debris or even water may find its way into your brake's hydraulic system. Brake fluid is hygroscopic, which means that it absorbs and retains water. Water in the brake lines leads to serious safety concerns and more complex repairs than the relatively simple pad replacement that you're finishing up with right now.

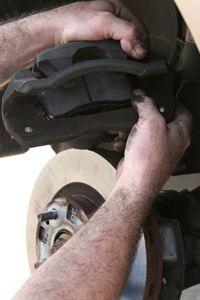
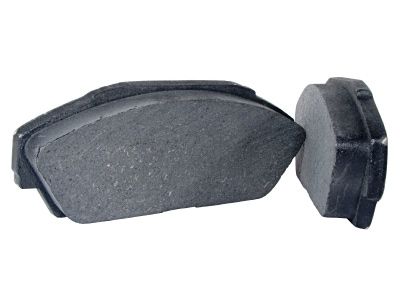
Installing the new brake pads themselves is just a simple matter of slipping the new pads into the slots where you found the old ones. If they don't easily fit in with your hands, you may want to tap them in gently with a hammer or rubber mallet. Then, replace the pins or bolts that held them in place and you're nearly done.

Next, move the caliper back into position on the brake rotor. Make sure it fits snugly, and tighten the bolts that hold the caliper in place. Make sure everything is back in place and then give the brake pedal a few pumps from inside your car just to make sure the pedal feels right to you. It may take several pumps of the pedal to get the brakes to properly seat themselves into their new position.

The rest of the brake repair is easy. Put the wheel back on, tighten the lug nuts, remove the jack stands and lower the car to the ground using your jack. It's just like changing a tire. Remember to fully tighten (and properly torque) the lug nuts once you have the vehicle back on the ground.

Also, don't forget to test drive the car to make sure that your brake work was successful. Fixing brakes is one thing; making sure they work properly is another.

For more information about braking and other related topics, follow the links on the next page. They'll provide you with lots more information.


Lots More Information

Related Articles

More Great Links

More Great Links

 Sources

  • Blocker, Mark. "How to Inspect Front Brake Pads." eHow.com. (Nov. 13, 2008) http://www.ehow.com/video_2260524_inspect-front-brake-pads.html
  • Blocker, Mark. "How to Replace Front Brake Pads." eHow.com. (Nov. 13, 2008) http://www.ehow.com/video_2260516_tools-changing-front-brake-pads.html
  • ExpertVillage.com. "Checking the Rotor, Caliper & Wear Indicator for Brake Pads." (Nov. 13, 2008) http://www.expertvillage.com/video/4691_disc-brake-pads-rotor-caliper-wear-indicator.htm
  • Google Product Search. "Buy Brake Pads." (Nov. 13, 2008) http://www.google.com/products?q=buy+brake+pads&oe=utf-8&sa=N&lnk=next&start=10
  • Memmer, Scott. "How To Change Your Brake Pads." Edmunds.com. (Nov. 13, 2008) http://www.edmunds.com/ownership/howto/articles/43787/article.html
  • Nice, Karim. "How Disc Brakes Work." HowStuffWorks.com. Aug. 21, 2000. (Nov. 13, 2008) https://www.howstuffworks.com/disc-brake.htm