How Trailer Bearings Work

roller bearings
These roller bearings play a major role in keeping your trailer riding smoothly.
© iStockphoto.com/Alan Heartfield

Let's face it: When you tow a trailer behind your vehicle, all you really want to do is get your payload from one location to another with minimal effort. You don't want the trailer to rock and rattle any more than is necessary, and you sure don't want it to slow you down. Luckily, you have a friend in this endeavor: trailer bearings.

You can't see these towing components without dismantling your trailer's wheel assembly, but bearings are in there doing you a world of good. They help to provide a smooth towing ride and prevent friction from slowing you down and unnecessarily wearing out your trailer's parts. Without them, heavy loads could grind wheel movement down to a standstill.

Advertisement

­But bearings require regular maintenance, such as greasing, to keep them rolling. With enough wear and tear, you may even have to replace them. If you own a trailer or plan to use one soon, it pays to recognize how bearings work and how to keep them in good repair.

Read the next page to learn just what goes on inside that wheel assembly and what exactly those bearings are doing.

­

Purpose of Trailer Bearings

Here's a little bit of advice for the next time you find yourself shopping around for a trailer: Get one with wheels. That may sound obvious. After all, if you're going to tow it behind a truck and venture onto the highway, wheels are mandatory. You can't just drag your payload behind the truck without damaging your goods and slowing down your progress. It all comes down to friction. Objects roll better than they slide, whether you're talking about a giant block of stone in the desert or the inner workings of a wheel assembly.

Just as you wouldn't want to drag a wheelless trailer down the road, you also wouldn't want friction to exist between the wheel and the wheel assembly. Simply snapping a wheel onto a spoke might be a great way to get a toy car rolling, but a wheel in a trailer needs to rotate smoothly and with as little friction as possible. In addition, you don't want the trailer's wheels to decelerate due to the weight of the radial load pressing down from above or the thrust loads that occur when you go around a tight curve.

Advertisement

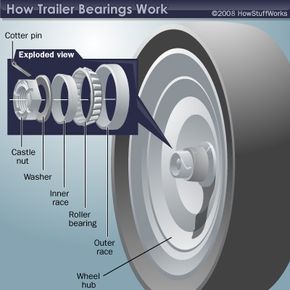
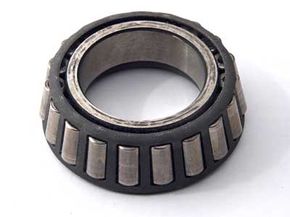
Coping with these demands is the purpose of trailer bearings. Trailer wheel hubs contain two sets of roller bearing assemblies, each between the inner race and the outer race. A roller bearing assembly roughly resembles a tapered, cylindrical bracelet with horizontal metal rollers caged in it. It absorbs the thrust and radial loads over the long, rolling surface areas of the bearings while also cutting down on friction. To learn all about bearings and their other varied uses, read How Bearings Work.

Grease keeps the trailer bearings lubricated and works as a coolant against heat caused by friction. A rubber-lipped seal helps to hold all the grease in and the dust and water out. Boat trailers pose the most risk on both counts due to the rapid cooling that takes place when their wheels are submerged. The air inside the wheel hub contracts, creating a vacuum. The vacuum can then suck in water and dust from outside. If water makes its way in there with the bearings, it's only a matter of time until corrosion and rust join the fun.

Eventually you're probably going to have to open up the wheel hub and grease or replace the bearings to keep things rolling smoothly. Find out how on the next page.

Installing Trailer Bearings

Diagram of a trailer bearing
Exploded view of a trailer bearing
HowStuffWorks

If you ever have to open up a wheel hub on a trailer, chances are you're going in to either grease the bearings or replace them because you didn't. The key is to make sure the trailer bearings stay greased on your own terms, so you don't find yourself replacing them on the side of the road at an inopportune time.

When installing trailer bearings or replacing them, you need a pair of pliers, a lug wrench, a hammer, a flathead screwdriver and the necessary means to jack the wheel up safely. Be sure to loosen the lug nuts with the lug wrench first. Once the wheel is in the air, all you have to do is follow a few simple steps.

Advertisement

­­First, completely remove the lug nuts and tire, followed by the dust cap or, if you're using one, the bearing protector. You can remove the dust cap by prying it off with the screwdriver, but a protector may require a few light taps with a hammer. To gain access to the bearings, you'll next need to straighten out and remove the cotter pin that holds the castle nut in place. Then remove the castle nut and washer.

The next move is to remove the wheel hub, which should simply slide off the central spindle if everything is in good condition. Next, pull the outer bearing off the hub. You may have to rock the hub or tap it with a mallet if the outer bearing is stuck. If you can't get it to move at all, you'll need to apply more force or take it to a garage. Once the hub is off the spindle, lay it down with the outer bearing facing up. Then remove the outer bearing (the bearing and race assembly closest to the outside of the wheel) and spindle washer, and set them aside. Next, pry off the inner seal and remove the inner bearing.

Now, you'll want to take the inner and outer bearing cages out of their races to clean them. Remove as much grease as possible from the parts with rags, then w­ash them in solvent or degreaser and leave them out to dry. Once dry, inspect the parts to make sure there are no visible signs of rust, corrosion or other damage. If you find any problems, you'll need to replace the parts.

Once you have clean, dry parts ready for reassembly, it's time to gob on some fresh bearing grease. With boat trailers, you'll need to grease the entire hub to help keep water out. Otherwise, just grease the race surfaces and pack the bearings with as much grease as they'll hold. You can perform this task by hand or with a bearing packer, which typically costs $20 or less. Once packed, insert the inner bearing and seal, followed by the outer bearing and seal. Be sure to grease the spindle along the way. Once these are back in place, all you have to do is install the washer, castle nut, and dust cap or bearing protector. Then simply put the wheel back on and jack the trailer back down.

­

If properly cared for, these towing components should help to keep your trailer rolling along smoothly. However, if you need to replace them; new bearings and seals generally run in the neighborhood of $25 for a set of two. Just remember, one size does not fit all. Make sure you bring old parts to the garage or auto parts store to ensure you pick up some pieces you can use.

Explore the links on the next page to learn even more about towing.
Lots More Information

Related HowStuffWorks Articles

More Great Links

Sources

  • Doll, Les. "Bearing Service." The RVers' Corner. 2005. (Oct. 10, 2008) http://www.rverscorner.com/articles/bearing1.html
  • Hetrick, Paul. "How To Repair Wheel Bearings On Your Trailer." SearchWarp.com. March 9, 2007. (Oct. 10, 2008) http://searchwarp.com/swa211385.htm
  • "How The Durahub System Works." Durahub.com. 2007. (Oct. 10, 2008) http://www.durahub.com/how-it-works.html
  • "Replacing the Bearing, Races and Seals on a Trailer Hub." Etrailer.com. (Oct. 10, 2008) http://www.etrailer.com/faq_wheelbearingpack.aspx